Plug-in and Play!
Plug-in and Play!
One of the most undervalued tools in the life of a digital artist or animator is the use of first or third party 'plug-ins' to both optimise your workflow, and open up a myriad of new tools and design opportunities. There are a wealth of plug-ins available for just about any design software you can think of, and when it comes to optimising your workflows, once you have them, you can't live without them!
This post is going to take a few examples of some of my favourite plug-ins for software that I have found to benefit my practice, explaining what they do, what new things they allow me to do, and ultimately how much time can be saved by using them.
Saber - Adobe After Effects
Since I've been experimenting in creating motion graphics for Twitch Streaming recently, I started looking at tutorials to create appealing designs within After Effects, but was struggling to find things that fit my personal style. I knew the look I wanted but creating it in After Effects was going to take an extremely long time, until I found out about 'Saber' from an online tutorial.
Saber is a plug-in for Adobe After Effects that allows you to apply a large number of preset effects to strokes and paths which can be simply edited using the plug-in UI. Previously these effects would take huge amounts of layers and keyframing to pull off even slightly well, but using Saber saves at least 2 dozen steps in creating the look you're going for.
Let's take a common task of adding a neon stroke to text in After Effects, and then adding some flicker to add motion. When done with the existing tools, a decent-ish look can be created using layer-styles and key framing, but the effect is far from what we're ideally looking for:


- Time consuming
- Lower quality
- Requires extensive keyframing and expressions
Thinking a bit more broadly this time, Battleaxe is a tool development studio who creates plug-ins to assist artists and animators in increasing the efficiency of their workflows and giving them new options. They offer paid and free tools which have their own names, but all fall under the moniker of 'Battleaxe'.
Rather than giving artists new effects and presets to play with like Saber does, Battleaxe tools mainly focus on saving animators as much time as possible. Take their 'Overlord' tool:

As the description reads, Overlord allows you to transfer Illustrator elements directly into After Effects without needing to save and then open files, like so:


This is a massive game changer in itself, given how transferring files between software is one of the most frustrating and time consuming parts of any workflow, especially if the software struggles to relink files when revisiting a project.
Also, because you're directly linked to After Effects, you can edit shapes and paths in Illustrator and then keyframe the changes directly into Ae. Not only is this a timesaver, but means your Ae workspace is a LOT cleaner due to not needing all that space for extra layers, since they're all in Illustrator anyway!
In terms of other tools available, there's 'Rubberhose 2' which allows for far more simplified and dynamic character rigging and animation:


And even very simple tools such as 'buttcapper', that allows you to edit strokes and caps with a quick click rather than having to drill down into 5 seperate menus:


From the massive time save we can see in using something like Overlord, to the more micro timesavers using Buttcapper, all of that saved time adds up into a significantly optimised animation workflow. If you're a working professional and regularly use After Effects, you can see why it would seem kind of silly not to use these tools, just from the raw time saving, allowing you more time to develop your projects or go have an early lunch.
Motion Tools 2 - Adobe After Effects
Those previous 2 plug-ins are all well and good for optimising the graphic design aspect of workflows within After Effects, but what about some actual motion? Motion Tools 2 is a plug-in I’ve had installed basically since I started using After Effects and the features it provides to speed up and refine the animation process of shapes and effects is invaluable. Here’s just a few of the things it can do:
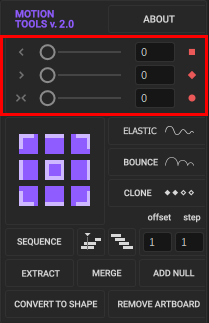
Easing Sliders - Easing sliders allow for quick ease in/ease out editing of animated objects without needing to edit the in-built Ae motion graph, which can usually be a finicky, confusing, and time consuming affair.
‘<’ represents ease in, ‘>’ represents ease out, and ‘><’ represents ease in and ease out.
Selecting the keyframes of any animated object and then using these sliders will automatically edit their ease in/ease out properties, making the process much simpler:

Clone - In the current version of After Effects, you can’t copy and paste frames from multiple layers at once. This means that if you have multiple objects you want to want animate at the same time, you need to individually CTRL + C and CTRL + V one layer at a time.

However if you use clone, you can select all the keyframes you want, hit clone, and it will copy and paste all of them to wherever your playhead is sitting.
It’s pretty self explanatory how much of a time save this can be!


Bounce - Animating bouncing objects in After Effects can be an annoying process even when you know what you’re doing, requiring multiple keyframes and motion graph edits to get the correct look.
Selecting the keyframes of an animated object and then clicking ‘bounce’ will automatically add a bounce to it, which can then be adjusted using the bounce UI window, to edit height, number of bounces, amplitude, etc.

-----
Final Thoughts
I have to say that with this research area, it was definitely preaching to the choir. I love plug-ins and finding new ones to speed up my workflow and make some of the more complex and time consuming tasks that much easier is always a positive experience in my book.
There’s really no reason not to use many of the free plug-ins out there, aside from some hardware limitations that some can cause.
I’m aware that there are plug-ins for many other softwares such as Photoshop, Clip Studio Paint, and Cinema 4D, but I felt that using these After Effects plug-ins best demonstrates just how time efficient they can make your workflow, regardless of the software you’re using.
I’m going to continue researching and using plug-ins as much as I possibly can, and I already have my eye on a few paid tools from Battleaxe which I can see myself purchasing soon!
Comments
Post a Comment